Disclaimer: This page may contain affiliate links, meaning I earn a small commission on direct purchases through them. You do not pay any more because of it. Please see my Privacy Policy, etc. page for more information. Thanks for your support!
Chamber staff have a lot of hats and little help, so we have to learn to do it all. Here’s my equipment setup that I use to record videos of myself, without any help.
Gear Setup
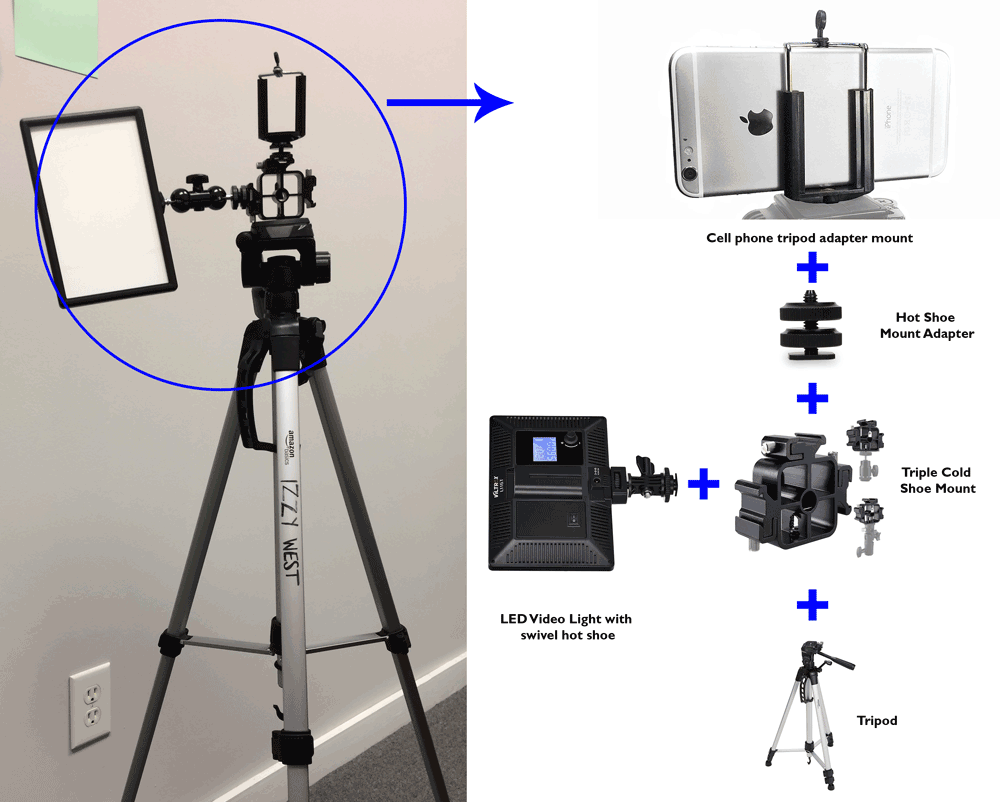
The key is in the equipment. Mine is lightweight & easy for me to carry and set up by myself, and it’s affordable. Excluding my phone, this cost me about $80 and has been well worth it (keep reading for $30 option).
- tripod
- smartphone tripod attachment
- hot shoe mount adapter
- LED video light w/ swivel hot shoe
- triple cold shoe mount

Or if you know you’ll be sitting on a desk, you can get this kit from Office Depot.
I prefer to record videos in a quiet room when I know I won’t be interrupted. But if that’s not an option, you can get a smartphone lavalier or microphone for around $20-50. This will make your talking clearer, and help reduce background noise. Microphones are an amazing investment to make any video more professional.
For a cheaper starter option, the bare necessities are the tripod and smartphone attachment. You can probably find these bundled together on Amazon for less than $30. Just check the tripod height.
Also, if you’re looking to implement more advanced software, like to add sponsor banners on your live videos, make sure your phone is compatible. If you have a pretty new phone it probably is, but in my example I didn’t and bought an iPad Pro.
Recording
After setting up my gear I use the default camera on my cell phone to record my video. (Tip: record a quick test video to check for anything weird, technical or visual.)
Then you can record your video just using your default camera app, or go live on social media. Going live can save you a ton of time as you don’t have to worry about editing.
Save & Edit
After recording the video, I go to my Dropbox or Google Drive app on my phone to upload it to the cloud. Then when I get to my computer I can download it and edit or use it as needed.
Or, you can also record a video (up to 10 minutes) directly in the Google Drive app on a phone. This can take a few minutes to update online, but saves you an extra step.
If you prefer to use it immediately, that’s fine too. You can post it immediately to social media or there’s a number of free & paid video editors in the store. Here’s an example of one I shot, edited, and posted all from my cell phone.
Once you have some practice, you can record & edit a video on your smart phone in about half an hour. Or if you can get good at doing it all in one take, you may not even need to edit!
Next:


